Showing posts with label Linux. Show all posts
Friday, February 4, 2011
Fusion-icon: Easily and quickly enable and disable desktop effects from your system tray
Compiz is a window manager for Linux that gives Linux desktops amazing 3d visual effects that surpass those of Windows 7 and Mac OS X Snow Leopard.
Ubuntu and Mint come with Compiz pre-installed and it is automatically enabled on computers with supporting 3d graphics cards.
Unfortunately on computers that are not powerful enough Compiz interferes with 3d applications and games, so the solution would be to disable Compiz before running a 3d app or game.
Unfortunately the way to disable Compiz is time-wasting and tedious as you have to go to Preferences>Appearance click on the Visual Effects tab and click none.
Fortunately there is a way to make disabling and reenabling Compiz easier and quicker, a small system tray applet called Fusion icon.
Search for fusion-icon in your package manager and then install it.
After you have installed Fusion icon it will appear in your menu.
Click on the Fusion icon icon to launch Fusion icon and it will appear in your system tray.
Right-clicking on Fusion icon shows a menu with various options.
We are only concerned with Select Window Manager (which allows you to switch between Compiz and Metacity (the normal 2d window manager)).
To make Fusion icon automatically start when your desktop starts you have to add it in Startup Applications.
Monday, January 24, 2011
Nautilus Elementary - file browsing simplified
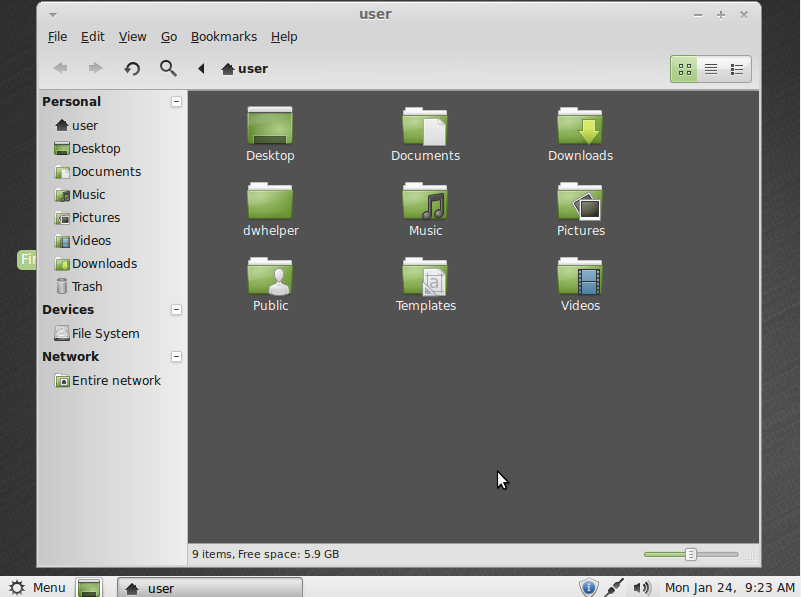
Nautilus Elementary is an unofficial version of Nautilus, the GNOME file browser, that is more streamlined and has more features than the official Nautilus.
Some features include a slider for easily changing the size of file icons as well as a new tab button that allows easier tabbed file browsing.
Nautilus Elementary was originally written for Ubuntu but can work on any GNOME-based Linux distribution.
Unfortunately Nautilus Elementary is not in the official Ubuntu repositories so we need to add an extra repository that contains Nautilus Elementary.
In the terminal enter the following commands line by line:
sudo add-apt-repository ppa:am-monkeyd/nautilus-elementary-ppasudo apt-get updatesudo apt-get dist-upgrade
nautilus -q
After doing the above commands the repository for Nautilus Elementary will be added and Nautilus Elementary will be installed.
Open up the file browser and you will notice that its appearance has changed slightly and it has some additional new features.
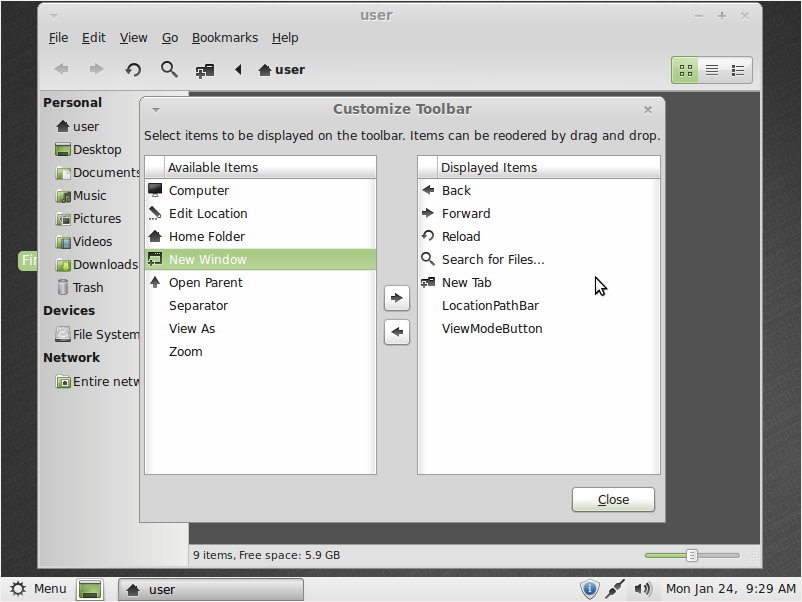
One useful new feature is a new tab button that can be added to the toolbar. This allows you to use tabbed file browsing without needing to open the file menu or press Ctrl+t. To add the New Tab button to the toolbar first go to Edit>Customize Toolbar. In Customize Toolbar it shows the buttons that are on the toolbar and the buttons which are not. To add the New Tab button to the toolbar click on the New Tab button in available items and then click on the right-pointing arrow to move it to displayed items.
Now the New Tab button is is in displayed items and is on the toolbar.
You can change the position of the New Tab button on the toolbar by dragging it up or down in displayed items.
Here's a picture of tabbed file browsing in action:
Labels:
GNOME,
Linux,
Mint,
Nautilus Elementary,
ubuntu
Saturday, January 22, 2011
Guide to DVD on Linux
This guide will show you how to access, view, manipulate and create DVDs on Linux.
Playing DVD videos
Linux can play all unencrypted DVDs out of the box.
Unfortunately because of licensing and patent restrictions most Linux distributions do not pre-install the software required to play encrypted DVDs.
To play encrypted DVDs on Linux you need to have a package called libdvdcss2 installed.
From Wikipedia:
libdvdcss (or libdvdcss2 in some repositories) is a free software library for accessing and unscrambling DVDs encrypted with the Content Scramble System (CSS).
Once you have libdvdcss2 installed you can play encrypted DVD videos with any Linux video player. My favourite player for playing DVDs is VLC.
Install VLC media player on Ubuntu
Backing up DVDs to your computer.
Here are 2 ways to backup DVDs on Linux.
Option 1: Copying the entire DVD as an .iso file to your disk.
Advantages: Everything will be copied including menus
Disadvantages: The file will be huge and the created .iso file cannot be played directly by most video players.
You can create an .iso file from a DVD with Brasero by choosing copy DVD and then choosing to write the copy to an image file (.iso file).
You can play a DVD video .iso directly with VLC media player.
Option 2: Ripping the DVD to a video file.
Advantages: The created video file will be smaller than the DVD, and it can be played directly by any video player.
Disadvantages: Some things eg. DVD menus will not be copied.
Some DVD rippers for Linux include dvd::rip and Acidrip.
Install Acidrip on Ubuntu
Creating DVD videos
There are many applications and methods of creating DVD videos on Linux.
Two of the easiest applications for creating DVD videos are ManDVD and Devede,
Both of these can convert any video file into a format suitable for DVD as well as allow you to create menus for your DVD.
Install ManDVD
Install Devede
Friday, January 21, 2011
Linux Mint 10: a easy to use and newbie friendly distro
I have been using Linux Mint for the past year and it has become my favourite Linux distribution.
Unlike what its critics say it is not simply just a remaster of Ubuntu. It has its own unique features like its great menu which is much better than the default GNOME menubar.
Also there is even a version of Linux Mint based on Debian.
True I could add these features to a normal Ubuntu installation by adding Mint's repositories but I prefer to have these features out of the box.
Linux Mint comes in various editions with different desktop environments.
A good thing is that the Mint editions are all called Mint and not named after they desktop environment they use as is the case with Ubuntu (which is good since Kint and Lint sound ugly).
As is the case with Ubuntu the main Mint edition uses GNOME.
There are other editions using different desktop environments like Linux Mint KDE and Linux Mint LXDE
Linux Mint is available for both 32-bit and 64-bit platforms.
This article will cover Linux Mint GNOME.
The latest version of Linux Mint is version 10 codenamed "Julia", which you can download from here: http://www.linuxmint.com/download.php
You can also download a user guide for Linux Mint from the same page.
Installation
After booting from the CD the live desktop will boot
Click on the Install Linux Mint icon on the desktop to start the installer.
It will ask which language you want to use, select English.
It will recommend you ensure the 3 things before continuing. While the first 2 are necessary the installation will work fine without Internet connectivity.
It will ask about the partition setup to use. In this case we will erase and use the entire disk.
It will tell you the partitioning setup it will use.
It will ask you the country and city you live in.
It will ask for your keyboard layout. If you are unsure what your keyboard layout is select USA.
It will ask you to type your name and a hostname for your computer, as well as a username and password for your user account.
It will ask if you want to login to your user account automatically or require a password to login, as well as if you want to encrypt your home folder.
I chose require password and not encrypt home folder.
After you click forward while it continues the rest of the installation it will show a series of splashes showing what Linux Mint is as well as some of its features.
After some time the installation will finish and it will ask if you want to continue using the live desktop or restart and boot the newly installed Linux Mint.
Post-installation
When you restart the newly installed Linux Mint will load. Select your user and type your password to logon to your desktop.
When your desktop first loads a welcome window will load which links to Linux Mint resource websites. You can untick "Show this dialog at startup" to stop this window from appearing again.
Click on the Mint menu. It shows all the locations on the system and all the installed applications as well as configuration and software installation tools.
Before we get onto the internet we should enable the firewall. Linux Mint comes with a preinstalled firewall configuration tool called Gufw. By default the firewall is disabled so we have to enable it.
Type gufw in the Mint menu search bar and it will show gufw. Click on the gufw icon to launch gufw.
It will ask you to enter your password. Enter it and Gufw will load.
As you can see the firewall is disabled. We have to enable it. Under Actual status click enabled. Now the firewall is on.
If you want to let an application through the firewall gufw can help you do that.
In this example I will allow the Transmission bit torrent client access through the firewall.
Choose Transmission from the list of applications to allow in and then click add.
As you can see now the ports for Transmission are opened and can receive data from anywhere.
Unlike what its critics say it is not simply just a remaster of Ubuntu. It has its own unique features like its great menu which is much better than the default GNOME menubar.
Also there is even a version of Linux Mint based on Debian.
True I could add these features to a normal Ubuntu installation by adding Mint's repositories but I prefer to have these features out of the box.
Linux Mint comes in various editions with different desktop environments.
A good thing is that the Mint editions are all called Mint and not named after they desktop environment they use as is the case with Ubuntu (which is good since Kint and Lint sound ugly).
As is the case with Ubuntu the main Mint edition uses GNOME.
There are other editions using different desktop environments like Linux Mint KDE and Linux Mint LXDE
Linux Mint is available for both 32-bit and 64-bit platforms.
This article will cover Linux Mint GNOME.
The latest version of Linux Mint is version 10 codenamed "Julia", which you can download from here: http://www.linuxmint.com/download.php
You can also download a user guide for Linux Mint from the same page.
Installation
After booting from the CD the live desktop will boot
Click on the Install Linux Mint icon on the desktop to start the installer.
It will ask which language you want to use, select English.
It will recommend you ensure the 3 things before continuing. While the first 2 are necessary the installation will work fine without Internet connectivity.
It will ask about the partition setup to use. In this case we will erase and use the entire disk.
It will tell you the partitioning setup it will use.
It will ask you the country and city you live in.
It will ask for your keyboard layout. If you are unsure what your keyboard layout is select USA.
It will ask you to type your name and a hostname for your computer, as well as a username and password for your user account.
It will ask if you want to login to your user account automatically or require a password to login, as well as if you want to encrypt your home folder.
I chose require password and not encrypt home folder.
After you click forward while it continues the rest of the installation it will show a series of splashes showing what Linux Mint is as well as some of its features.
After some time the installation will finish and it will ask if you want to continue using the live desktop or restart and boot the newly installed Linux Mint.
Post-installation
When you restart the newly installed Linux Mint will load. Select your user and type your password to logon to your desktop.
When your desktop first loads a welcome window will load which links to Linux Mint resource websites. You can untick "Show this dialog at startup" to stop this window from appearing again.
Click on the Mint menu. It shows all the locations on the system and all the installed applications as well as configuration and software installation tools.
Before we get onto the internet we should enable the firewall. Linux Mint comes with a preinstalled firewall configuration tool called Gufw. By default the firewall is disabled so we have to enable it.
Type gufw in the Mint menu search bar and it will show gufw. Click on the gufw icon to launch gufw.
It will ask you to enter your password. Enter it and Gufw will load.
As you can see the firewall is disabled. We have to enable it. Under Actual status click enabled. Now the firewall is on.
If you want to let an application through the firewall gufw can help you do that.
In this example I will allow the Transmission bit torrent client access through the firewall.
Choose Transmission from the list of applications to allow in and then click add.
As you can see now the ports for Transmission are opened and can receive data from anywhere.
Now that our firewall is on we can safely use the internet.
Mint comes with most audio and video codecs as well as Flash out of the box.
Here is Firefox playing a movie trailer on Youtube.
Here is the default movie player playing a video on my disk.
Overall I think Linux Mint 10 is one of the best Linux distributions available today.
It has ease of use, speed, beauty and performance.
I give Mint 10 a 10/10.
Subscribe to:
Posts (Atom)